반응형
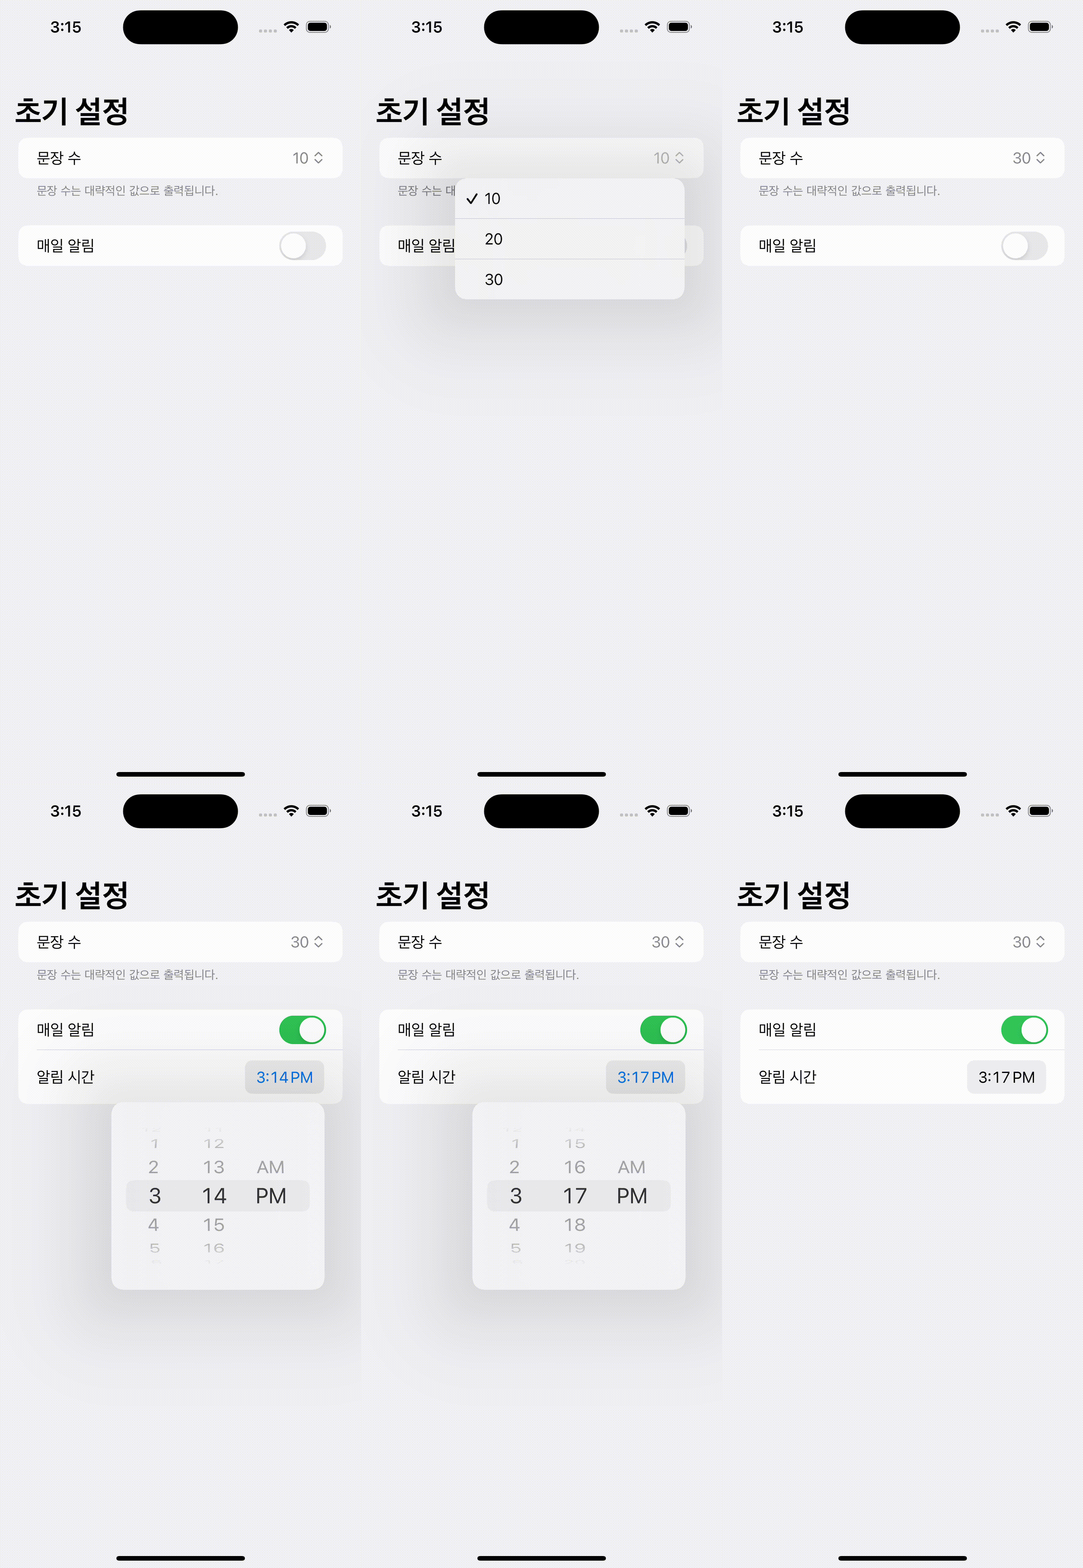
앱의 초기 설정 화면을 Form을 사용해서 화면을 그려보았다.
Form은 섹션을 나누어 그룹화된 목록들을 보여줄 때 유용하게 쓰일 수 있다.

import SwiftUI

struct FirstSettingView: View {
    // 문장 수 설정 변수
    @State private var sentence = 10
    let sentences = [10, 20, 30]

    // 알림 토글
    @State private var isOn = false

    // 알림 시간 설정
    @State private var notificationTime = Date()

    var body: some View {
        NavigationView {
            Form {
                Section {
                    Picker("문장 수", selection: $sentence) {
                        ForEach(sentences, id: \.self) { count in
                            Text("\(count)")
                        }
                    }
                } footer: {
                    Text("문장 수는 대략적인 값으로 출력됩니다.")
                }
                Section {
                    Toggle(isOn: $isOn, label: {
                        Text("매일 알림")
                    })

                    if isOn {
                        DatePicker("알림 시간", selection: $notificationTime, displayedComponents: .hourAndMinute)
                    }
                }
            }
            .navigationTitle("초기 설정")
        }
    }
}
navigationTitle 설정을 위해서 NavigationView를 감싸주었다.
NavigationLink나 navigationTitle이 필요하지 않다면 NavigationView를 사용하지 않아도 될 것 같다.
문장 수를 선택하는 Picker 부분과 알림 설정 Toggle 부분을 Section으로 나누고,
Toggle의 경우 활성화를 시키면 하단에 DatePicker가 나오게 했다.
제일 하단에는 다음 화면으로 넘어가는 버튼을 배치하고 싶었는데
Form의 특성으로 인해 버튼을 배치하면 하나의 목록처럼 보이거나 완전히 분리되는 모양으로 나타나게 된다.
    var body: some View {
        NavigationView {
            Form {
                Section {
                    Picker("문장 수", selection: $sentence) {
                        ForEach(sentences, id: \.self) { count in
                            Text("\(count)")
                        }
                    }
                } footer: {
                    Text("문장 수는 대략적인 값으로 출력됩니다.")
                }
                Section {
                    Toggle(isOn: $isOn, label: {
                        Text("매일 알림")
                    })

                    if isOn {
                        DatePicker("알림 시간", selection: $notificationTime, displayedComponents: .hourAndMinute)
                    }
                }
                Button("Button1") {}
            }
            .navigationTitle("초기 설정")
        }
        Button("Button2"){}
    }

Button1, Button2처럼 말고 하단에 위치한 버튼을 만들기 위해 ZStack을 사용했다.
struct FirstSettingView: View {
	// 생략

    var body: some View {
        NavigationView {
            ZStack {
                Form {
                    Section {
                        Picker("문장 수", selection: $sentence) {
                            ForEach(sentences, id: \.self) { count in
                                Text("\(count)")
                            }
                        }
                    } footer: {
                        Text("문장 수는 대략적인 값으로 출력됩니다.")
                    }
                    Section {
                        Toggle(isOn: $isOn, label: {
                            Text("매일 알림")
                        })

                        if isOn {
                            DatePicker("알림 시간", selection: $notificationTime, displayedComponents: .hourAndMinute)
                        }
                    }
                }
                VStack {
                    Spacer()
                    Button("시작하기") {

                    }
                    .foregroundColor(.white)
                    .padding()
                    .frame(maxWidth: .infinity)
                    .background(Color.blue)
                    .cornerRadius(10)
                    .padding()
                }

            }
            .navigationTitle("초기 설정")
        }
    }
}
반응형
'DEV - iOS > iOS' 카테고리의 다른 글
| [Swift / JAVA] iOS 프로젝트 Google Login 서버 만들기 (0) | 2022.11.01 |
|---|---|
| [Swift] iOS 프로젝트 Google Login 구현하기 (0) | 2022.10.22 |
| [Swift] FSCalendar 라이브러리로 달력 구현하기-1(설치) (0) | 2022.08.08 |
| [Swift / SpringBoot] WebView로 SpringBoot 서버 화면 띄우기 (0) | 2022.08.02 |
| [Swift] Firebase Firestore 데이터 저장하기(이메일 중복 검사) (0) | 2022.05.21 |